"Hi mate, Henry sent me over as I'm looking for someone with the skill to make me a real wood false floor?" That's how it all started.
This post title in a nutshell explains the rate in which this particular project grew. Being completely honest I have the worst memory known, it often gets me into trouble. I can't completely remember where this project started to snowball although I am absolutely and quite unusually sure it was nothing to do with me. Jack Waller, the owner of this project Audi 100, a designer and design company manager by trade is quite an impulsive guy, you throw a "2" at him and he'll throw a "4" straight back. As cliche as it sounds these days in car culture he's not afraid to do what he wants as in, in the least selfish way, its all about him, no concern for others opinions.
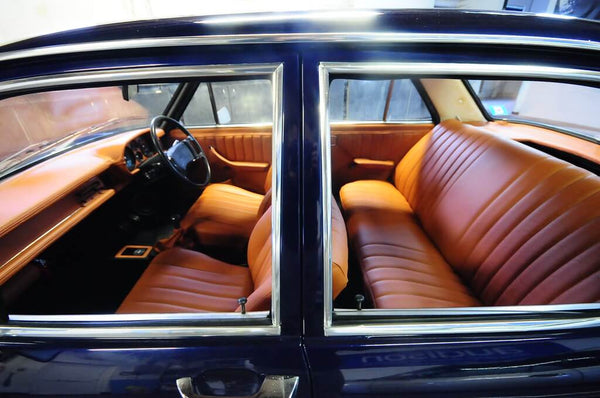
Take the leather colour for instance, completely against my "better judgement" he chose what he calls David Dickinson Orange (Actually Porsche burnt Orange).... And it works.
Going back to our first encounter. We agreed to meet up on a cold Saturday morning at a friends local "Breakfast BHP" meet at The Roebuck Inn just north of Wickham on the A32, a meet that is held on my route to work, this was handy as it's a bit of a pain to find the workshop your first time around. We spent an hour or so looking around a few cars nice and early in the morning and then headed over to work for a shake down of the car and to discuss Jacks real wood veneer (much simpler to work inside a cars lines) boot floor.
The car was booked for 3 days initially, check and service the already installed air ride system, a false floor to be made and flushed then veneered in a dark wenge wood and re-jig the air system to suit. By day four on Jacks request we had 4 Viair triples, 8 metres of hard pipe and two speciality suspension seamless tanks in house, the car was to receive a streaming audio system and a flushed in boot build, trimmed in the same Porsche leather that the rest of the car is to be trimmed in on its next booking.
This next booking by the way was the Monday after the Saturday we finished the air and audio install. The car was used for a friend of Jacks to be used as their wedding transport.
I'm getting ahead of myself.. So the decision changed early on to start going a little more full on. The first stage of the work on this car included boot fabrication and a streaming audio system, the spec for the audio system is as follows:
- Audison Bit ten D Processor
- Audison Voce 6.5 Component Speakers
- Audison VOCE AV10 Subwoofer
- Hertz HDP5 Amplifier
- Streaming hardware
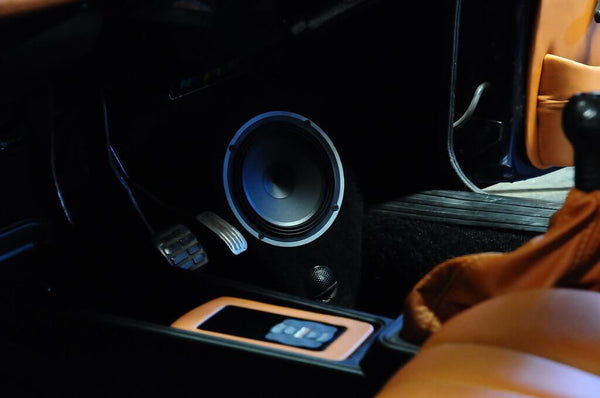
The system, almost completely invisible, lies underneath the rear bench where the battery is also kept on this car. Without the front speaker kick builds, you wouldn't know anything had been done. All controllable from Jack's phone.
You'll notice in the above picture the new Airlift management controller. Part way through stage one we found the original Airlift V2 management had gathered a few faults. It was decided to get rid of this system in favour of Airlift 3p seeing as though we were on a future proofing mission. This was flushed into the centre console and trimmed in the same leather as the rest of the interior.
Whilst upgrading the management we had the discussion about the set up in the boot, two 5 gallon seamless tanks were chosen and to keep that 10 gallon capacity topped up as quickly as possible, 4X viair 444 compressors were ordered. A multi relay network was made in house to control all compressors and fuse them accordingly. You can stall the car with the draw if you don't poke the throttle prior.
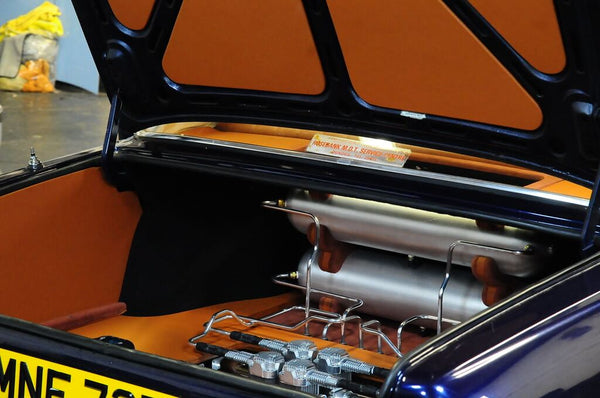
The boot fabrication was started with a design in mind to have the tanks on an in house made stack mount, one above the other. This was constructed using 6 different ply sections, then smoothed and trimmed. Then the huge floor was built in two sections and bonded together, this sits over the compressor rack and around the stacked tanks. The inner edge of the compressor rack has a double stitched add on section to get around the 18mm depth of the floor panel, this thickness was chosen to keep things as strong as we could.
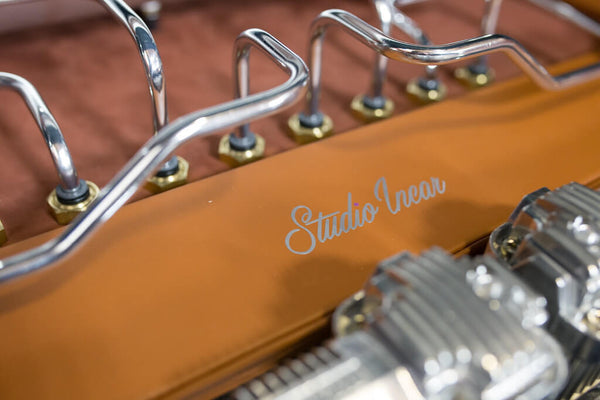
The tank section was then hard piped to the compressor section with aluminium piping, all exposed metal panelling was sound deadened and then trimmed in a black carpet to match the interior carpet.
So with this section complete, Jack collected the car and took it to a friends wedding to use as their vehicle. This was a Friday evening collection and the car was back with us Sunday evening. Now admittedly we couldn't start the car for a couple of weeks due to other bookings but the car wasn't in our way and Jack had no plans to use it straight away.
Chapter Two
This is my first complete interior. I've always trimmed my own panel work and am quite proud of my technical work in that area but I had never touched an interior, let alone an interior of this vintage. Jack knew this and trusted us to take on this task. I must admit I completely underestimated this art. It took me a lot longer than expected, a few days uncharged for respectfully as I re-worked my mistakes etc and various swear words but we got there.
It still isn't 100% finished as we had a couple of outstanding things I couldn't get done within the booking although the car is due back for us to strip down for paint soon enough so this will give us a chance to finish it off completely.
I suppose if we put it under the magnifying glass of more seasoned trimmers there are faults to pick, or practices that are different to what another would take. Both me and Jack are very happy with how its turned out. I'm particularly hard on myself and anyone who works with me to ensure a very high standard so I'll always ask for honest opinions in person and have had some very positive feed back. I'm pretty sure the car has been out once and took home a "best interior" award which is quite nice.
So the interior as a whole was a pretty serious job that included not only the trim of parts but the repair of an awful lot.. Here's a quick rundown, I'll miss an awful lot here:
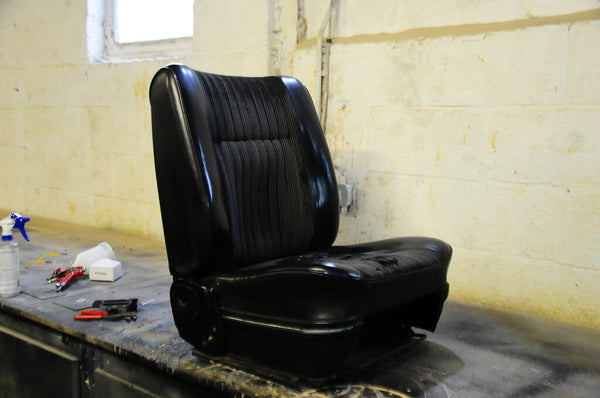
- Trim front seats in new pleated design
- Trim rear bench - same design
- Trim door cards to match seat style
- Trim dash
- Repair dash
- Repair all door cards
- Repair rear shelf
- Trim custom rear shelf
- Rust treat bare floor (what an absolute nightmare job)
- Sound deaden all panelling incl floor
- New or dyed carpet (we dyed the original)
- Straighten out dash loom
- Under dash trays, smooth off build new and trim
- Gear and handbrake surround
- Air controller mount
Reading that list back through to myself really does play down the amount of work that went into getting this interior straightened out before I could even look at my sewing machine.

New Leather Trim Ready to Cut

Cutting the Strips out
Each part of the interior was taken one stage at a time so to not get myself in a right pickle. The rear bench being first, front seats, doors and so on. The carpet and floor pan were another one of these stages.
Picture a Tuesday afternoon, the floor pan of the Audi 100 is sanded back and I'm ready to start applying this rather serious looking can (or three cans) of "rust defender".. I didn't really realise quite how potent this stuff was. 15 minutes in I'm slobbering uncontrollably, my eyes are running, I'm singing at the same time, it took me an hour before I started hallucinating that I realised something was going on. My wife turned up around half an hour after this and suggested she take me home so I could have a cold bath. I don't know what went wrong, I was having a great time.
Never again... That situation aside the job got done and with 24 hrs to cure the deadening applied and carpet jet washed, steamed and shampoo'd then dyed. I really didn't have high hopes for the dying of the carpet but it came out like new and genuinely looks fantastic, it made such a huge difference to the overall look of the interior.
With the carpet finished, sound deadening installed, the carpet was left for 24 hrs to dry out. It was really hot the day the carpet was dyed but still rather than mark the trim, we left it. As soon as this was ready it was on with the in of the entire trim. This was a very special couple of days seeing it completely coming together I imagine it was as special for us as it was Jack other than the fact he'd had to deal with a decent wait to see the car finished.
The door cards were a tricky part of the build, not one of them were straight, in one way or another they all needed repairing before trimming. The door handles were stitched by hand. The ashtray sections were also stripped and trimmed, then the window winders were stripped of their rubber outers and hand polished then installed.


The rear deck was a last minute decision, the install as decent looking as it is on its own was quite tucked away and you had to really get in there to see the work that went into the tank mounts. An evening call was made and Jack was asked to come over for a look at something we'd come up with. It's a little outside the box for the design of the car however I think with how far the car has come along and a few designs not in keeping with a stock 100 it fits right in for a personalised project such as this.


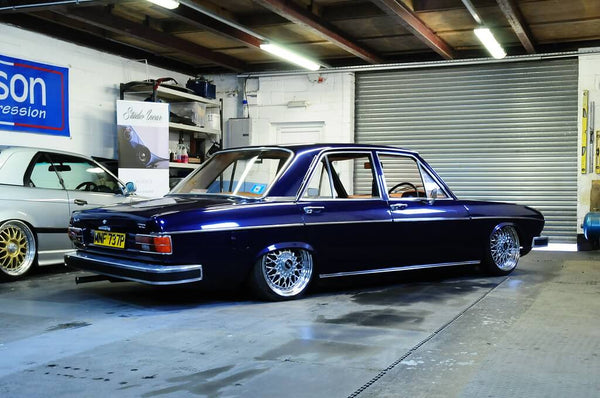
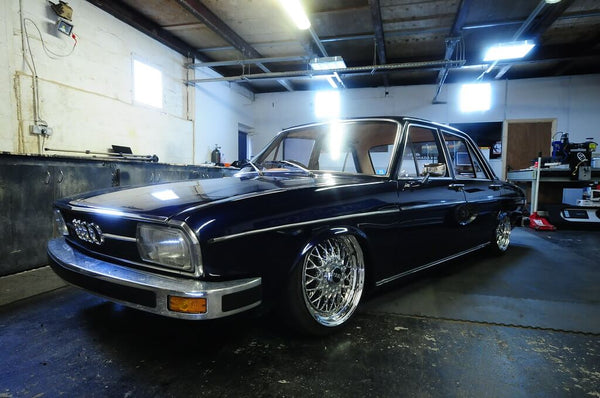
And a few overall shots of the finished but not completely finished car.
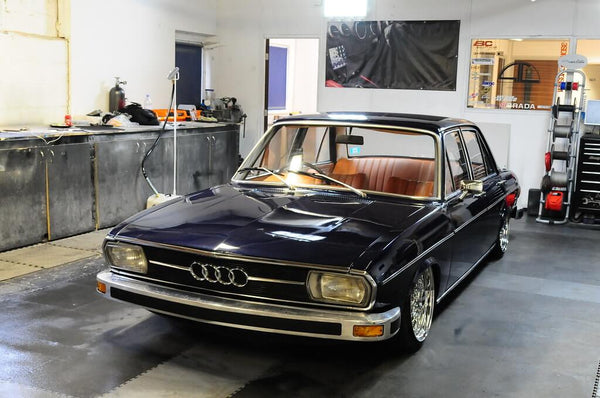


And there she is for all to see. A great car this with a stellar owner who's plans are way beyond whats been done up until now. There are talks of potentially tubbing this old girl which makes me very happy. It now smells like a cobblers patio and looks as good as it smells.
Thanks to everyone who got this far into this pretty lengthy blog post, its taken a while to do the job so it seems fit that it would get an in depth explanation.
As always, social media sharing and comments are welcome on our Facebook page or Instagram @Studioincar
A big thanks needs to be said to our good friend Henry at Slam Sanctuary for landing Jack at our door, a good friendship has been made and a fantastic car is part way through being built, I'm very happy to be a part of it.
Thank you.
Words and Pictures - Shakey | Studio Incar